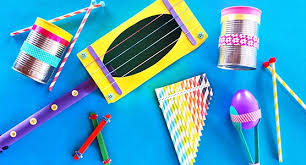
We all know how much kids love to make noise – I mean, music! So why not channel that energy into something creative and fun? Making musical instruments from household items is not only a fantastic way to keep your little ones entertained, but it also sparks their creativity and love for music. Plus, it’s an excellent opportunity for some quality family time. Of course theres the simple, wooden spoon on pots and pans which the little ones love! But let’s dive into some easy DIY musical instrument projects you can whip up at home and make into a fun craft activity!
1. Shaker Bottles
What You’ll Need:
- Empty plastic bottles (water bottles work great)
- Rice, beans, or pasta
- Tape or glue
- Optional: stickers, paint, or markers for decoration
Instructions:
- Clean and Dry: Make sure your plastic bottles are clean and dry.
- Fill It Up: Fill the bottles with rice, beans, or pasta – experiment with different materials to see how the sound changes.
- Seal It: Secure the cap with tape or glue to prevent any spills.
- Decorate: Let the kids go wild with stickers, paint, or markers to personalize their shakers.
2. Rubber Band Guitar
What You’ll Need:
- Empty tissue box or shoe box
- Rubber bands of various sizes
- A paper towel tube (optional)
- Glue or tape
- Optional: paint or markers for decoration
Instructions:
- Prepare the Box: Remove any plastic from the tissue box opening. If using a shoe box, cut a circular hole in the center.
- Stretch the Bands: Stretch rubber bands around the box, over the opening. Use different sizes to create different pitches.
- Add a Neck: For a guitar neck, tape or glue a paper towel tube to one end of the box.
- Decorate: Let the kids decorate their guitars to make them truly their own.
3. Tin Can Drums
What You’ll Need:
- Empty tin cans (various sizes)
- Balloons
- Scissors
- Rubber bands
- Optional: markers or paint for decoration
Instructions:
- Clean the Cans: Make sure the tin cans are clean and free of sharp edges.
- Make the Drum Head: Cut the end off a balloon and stretch it tightly over the top of the can.
- Secure It: Hold the balloon in place with a rubber band.
- Decorate: Let your little ones decorate the tin cans with markers or paint.
- Drum Away: Use your hands or wooden spoons as drumsticks and let the beat begin!
4. Paper Plate Tambourine
What You’ll Need:
- Two paper plates
- Jingle bells
- Hole punch
- String or yarn
- Markers or paint for decoration
Instructions:
- Decorate the Plates: Let the kids decorate the bottom sides of the plates.
- Punch Holes: Punch holes around the edge of the plates, about an inch apart.
- Add Bells: Thread the string through the holes, adding a jingle bell every few holes. Tie knots to secure the bells.
- Assemble: Place the plates together with the decorated sides facing out, and finish threading the string around the edge to hold them together.
5. Spoon Maracas
What You’ll Need:
- Plastic spoons
- Plastic Easter eggs
- Rice, beans, or beads
- Tape
- Optional: markers or stickers for decoration
Instructions:
- Fill the Eggs: Open the plastic Easter eggs and fill them with rice, beans, or beads.
- Secure with Spoons: Place the filled egg between two plastic spoons.
- Tape It Up: Use tape to secure the spoons around the egg.
- Decorate: Add some flair with markers or stickers.
- Shake Away: Your maracas are ready for some shaking fun!
These DIY musical instruments are a fantastic way to get creative with your kids and make some joyful noise together. Plus, they’re perfect for a mini family concert! At Coastal Babysitters, we love seeing families bond over fun and creative activities. So gather your materials, unleash your inner musician, and have a blast making music with your little ones.
Don’t forget to share your creations with us on social media – we’d love to see your DIY instruments in action!
Happy crafting!


